There’s a rumbly in our tumbly for these adorable Winnie The Pooh Cake Pops!
Cake pops are delicious on their own, but you can make them extra sweet and magical with this Winnie the Pooh inspired recipe from Disney Family! You can even pick any cake flavor you want to make them your own.
Baking them is super easy and fun, just take a look:
WINNIE THE POOH CAKE POPS
INGREDIENTS:
- 1 box of cake mix (bake as directed on box)
- 1 16oz can of ready made frosting
- Wax paper
- Baking sheets
- Yellow candy coating
- Purple candy coating
- Brown rainbow chip sprinkles
- Black edible ink pen
- Toothpicks
- Paper lollipop sticks
- Styrofoam block
Related – Delicious Winnie The Pooh Lemon Bars Perfect For This Spring!
INSTRUCTIONS:
- After cake is cooked and cooled completely, crumble into a large bowl.
- With a large spoon, mix thoroughly with about 3/4 of the can of frosting. You won’t need the rest.
- Roll mixture into quarter size cake balls and place on a wax paper covered baking sheet.
- Place cake balls in the freezer for about 15 minutes to firm up. You can transfer them to the refrigerator to keep chilled and avoid freezing.
- For Winnie the Pooh: Shape Pooh’s head by pressing a lollipop stick to shape his brow.
- For the Hunny Pots: Shape the cake balls into ovals.
- Dip the lollipop sticks in a bit of candy melts and insert them into the cake balls. Return the cake pops to the refrigerator to maintain firmness.
- For Winnie the Pooh: Melt yellow candy melts and dip the Pooh’s heads into them. Let the excess of coating to fall off and place the cake pop on a styrofoam block. Repeat with remaining Pooh’s heads.
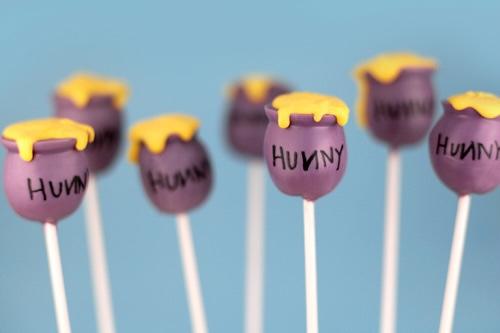
- For the Hunny pots: Melt the purple candy coating. Dip into the candy coating so the cake ball is completely covered. Remove and let most of the excess fall off back into the bowl. Then, place the cake pop on a wax paper covered baking sheet. Some of the coating will rest at the base forming the edge of the pot. Repeat with remaining pots and let dry completely.
- Heat yellow candy coating and use a spoon to apply it to the top of the pots. If you let it thicken for a few minutes, it will be less likely to run down the pot. You want it thick enough to drip over the edge, but not too runny that it makes a mess.

- Once dry, you can add the details with the black in pen like the “hunny” word, reversing the direction of the N for an extra Winnie the Pooh detail and Pooh’s features.
- Let your Winnie the Pooh cake pops dry completely in a styrofoam block.
Enjoy your Winnie the Pooh Cake Pops!
Credit: Disney Family

Let our friends at Destinations to Travel help you book your next Disney Vacation. They are the preferred Travel Agency of Chip and Company and Disney Addicts, and who we use ourselves.
Get started below for your FREE No Obligation Quote.
Book With our friends at Destinations to Travel
For the BEST in Disney, Universal, Dollywood, and SeaWorld Theme Park News, Entertainment, Merchandise & More follow us on, Facebook, Instagram, and Youtube. Don't forget to check out the Chip and Company Radio Network too!

